Collaborative Development with VSCode and Keil
Keil is a familiar face among hardware development IDEs — so much so that many people who started with C51 probably used Keil. But I have never been quite convinced by Keil’s editor. VSCode, backed by Microsoft, has undoubtedly been battle-tested by countless developers and feels far more comfortable to use. This article therefore introduces the steps for developing with VSCode together with Keil uVison 5.
Steps
1. Install VSCode and Keil
VSCode can be downloaded and installed from the VSCode official website. For Keil, there is a tutorial in another one of my articles — Installing C51 and MDK Arm in Keil together. If the tutorial does not clearly require anything specific, install according to your own needs; if there are no special requirements, an all-defaults installation is fine too.
VSCode has a Chinese localization plugin. You can install it by following this tutorial: How to set Visual Studio Code to Chinese.
Since the default character encoding is
ANSI, Keil will show garbled text when editing or displaying Chinese. You can change the default character encoding toGB2312in Keil’s settings to avoid the garbled Chinese. VSCode’s default configuration also cannot display Chinese properly, so you need to configure it as follows: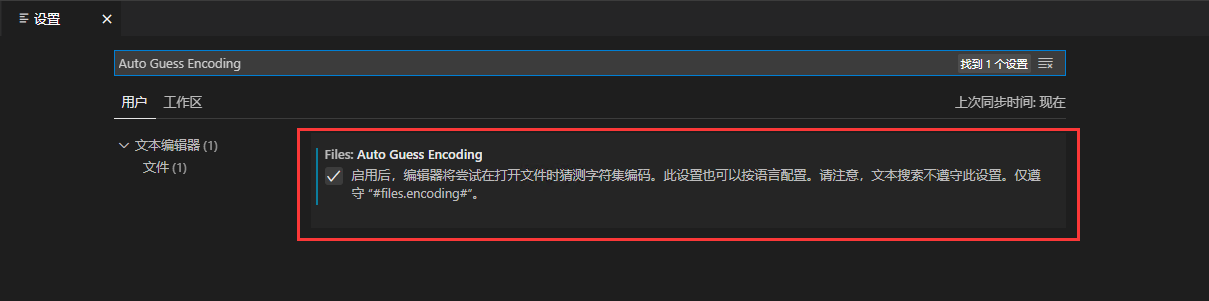
Auto-detect character encoding - Press the shortcut
CTRL+,or open File -> Preferences -> Settings; - Type
Auto Guess Encodingin the search box and search; - In the results, find the
Auto Guess Encodingoption and check it, and the encoding will then be adapted and detected automatically.
- Press the shortcut
2. Install the required plugins in VSCode
Install the Keil Assistant plugin as shown in the figure:
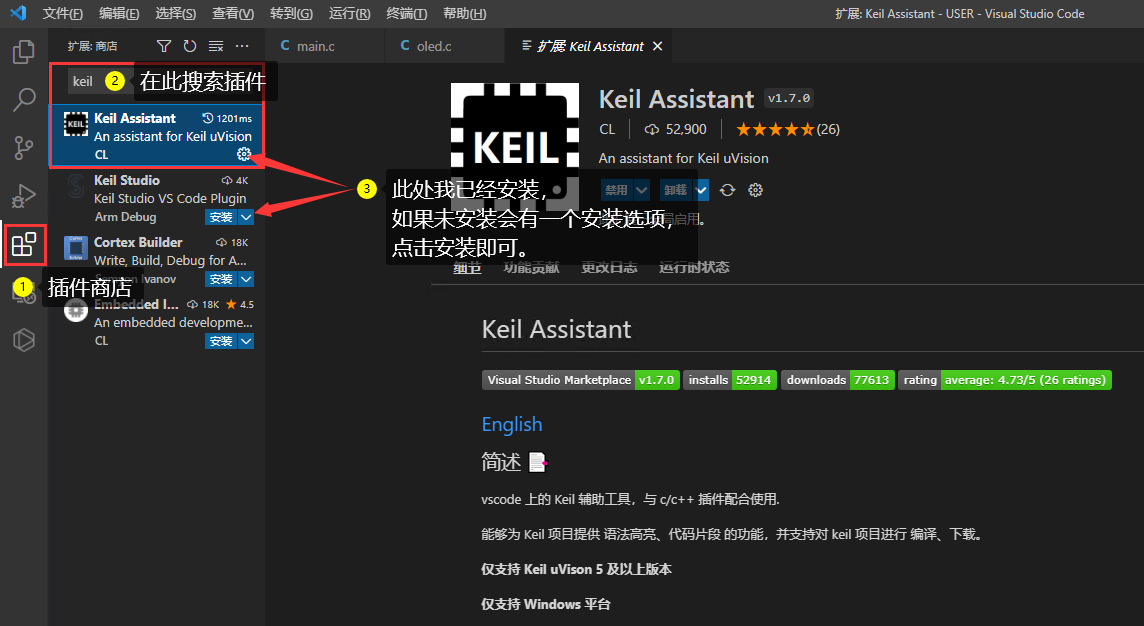
Keil Assistant After installation, the install button turns into a gear icon. Click the gear and select Extension Settings to enter the plugin settings page, where you can see the two configuration parameters shown in the figure:
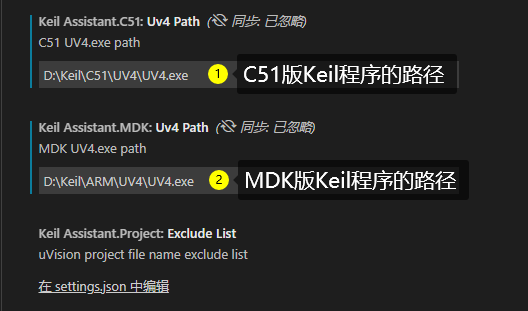
Keil Assistant configuration
Regardless of the version, there is an executable at/Path To Keil/UV4/UV4.exein the Keil installation directory; fill its path into the corresponding configuration parameter. Fill the upper one with the path to the C51 version’s UV4.exe, and the lower one with the MDK-Arm version’s UV4.exe. If you have not installed a version, leave it blank; if you have installed both, fill in both.
3. Write code in VSCode
Compared with Keil’s clunky native editor, once you use VSCode you will never want to go back — it is truly a case of “having had the best, nothing else quite measures up.”
Compiling, recompiling, and flashing of Keil projects is done by calling Keil’s command-line interface.
According to the plugin author, the plugin essentially calls Keil’s command-line interface, so before writing code in VSCode you need to prepare the Keil project files in advance, and it is best to compile once and close Keil before writing code in VSCode.
Import the Keil project file as shown in the figure:
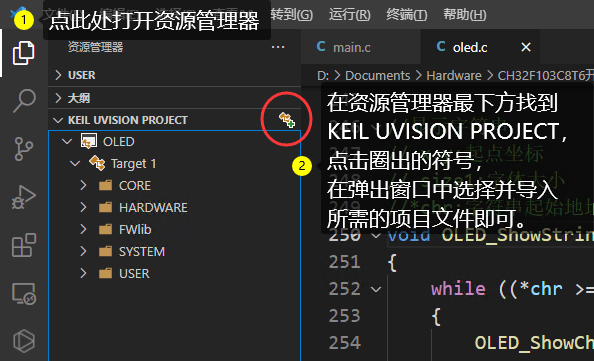
Import the Keil project file in VSCode The options for compiling, flashing to the device, and recompiling are shown in the figure:
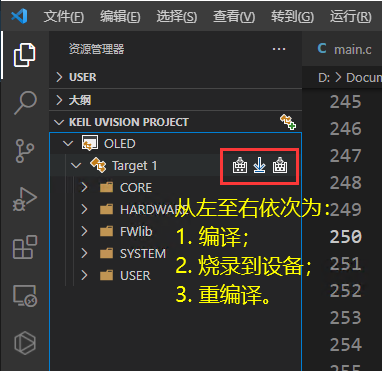
Using the plugin
4. Afterword
Since my computer’s runtime environment is well configured, I did not run into many problems, so this article is not written very rigorously and many small details are not mentioned. There are plenty of tutorials online, and I will not go on repeating them; here I will put one that I approve of. If you run into a problem not mentioned in this article, you can go there to check and solve it: Using the keil plugin on VS Code.
Problems not mentioned roughly include the following:
- Missing plugins such as:
- C/C++
- Missing a compiler — if you have not installed Visual Studio, the MinGW compiler is recommended;
- The following plugins are also recommended to assist with programming (the text in parentheses describes what they do; for details you can go to the official site and search):
- Tabnine AI Code Completion (Tab-key AI code completion)
- Visual Studio IntelliCode (AI-based smart code completion)
- C/C++ Extension Pack (C/C++ extension pack)